Monday 1 December 2014

FM Synthesis with Beap


Here is another Beap sketch with Max 7, this time using the FM oscillators with lots of options for modulation. There are two control options: a standard keyboard and a function for controlled sweeps.

These are some sound design examples showing the range of tones achievable from just these few modules. I've focused more on electronic sfx type sounds, but the usual FM keyboard sounds are also possible.


I was going to include the preset file, but then changed my mind - discovering sounds for yourself is the fun bit! The preset system should work though.

Download the patch here.

Sunday 16 November 2014

A Quick Beap Sketch


Here is a quick sketch I put together with Beap and Max 7(!)

It sounds like this:


You can download it here.


Tuesday 11 November 2014

[*~ ]


I was looking through some old sounds I'd archived created by some Max patches I made a few years ago. At the time I was playing around with ring modulation in Max, seeing how far I could push it. Here are a few sounds from that period, chosen for their spectrogram. I love the way the frequencies collide, split and multiply...


Thursday 6 November 2014

Sound Design Toolbox Part 3: Random Slice Container


This is my favourite of the toolbox players so far. As the name suggests, instead of playing complete sounds from start to finish the container plays a slice from a random point in the file. Further controls can randomly adjust pitch and the length of slice played along with a few other options. What excites me about this device is how useful it is for creating a non-linear or generative system for aiding the design process. In short: designing the system to design the sound rather than designing the sound itself.


This patch is based on an old idea I started to develop a few years ago - a machine which would take a bunch of sounds and combine them together in new ways. I got quite far with its development, then Twisted Tools released the S-Layer instrument that was basically the device I was working on, finished and better than anything I thought I could make! Looking back, this wasn’t really a good reason to stop, but I ended up working on other projects and that all got stuffed in the ‘half finished things’ folder. Thinking again about the concept now though, I can see new life for the idea if it is part of a modular system. So instead of creating a finished device I’m now aiming for small modules that can be strung together by the user to create more complex architectures.

In its basic state, the patch implements one of the most simple sound design techniques of them all: combining more than one sound to create a new sound. This is still the most fundamental process we have, and it is still often a manual process: loading up a DAW, browsing libraries, combining sound on multiple tracks, making adjustments in pitch, position etc. Because of their complexity, some sounds require more layers and the process can become very time consuming. This tool comes in useful is when you have many sounds to combine but there is no specific combination necessary, so it works well for abstract sounds or layers such as impacts or sweeteners.


The patch itself is delightfully simple to use:


1.     Drop a folder of sounds into it.

2.     Set polyphony to whatever seems sensible

3.     Choose envelope shape

4.     Set slice size parameters

5.     Set pitch variation and reverse chance

6.     Trigger with a bang in the left inlet or trigger with Uzi to fire off combinations of multiple sounds

Here are the patches:

Random Slice Container 0.9


Polyphony is set on the dial at a maximum of 64, but this can be changed in the patch itself if you need more voices. Polybuffer~ is at the heart of this patch, I’m finding it such a useful object for sample based work like this. The patch itself is fairly well annotated so it should be fairly easy to understand what is happening.


To give you a flavour of how I’m using this I've put together some example sounds thrown together very quickly during the testing phase. I tend to find some settings I like, set the patch running with a metro and then record out a string of those sounds. 


Please let me know if you have any problems or suggestions, these patches are still a work in progress and are likely to change before I call them finished.

These patches are licensed under: 

Attribution-NonCommercial-ShareAlike
CC BY-NC-SA 
 
This license lets others remix, tweak, and build upon your work non-commercially, as long as they credit you and license their new creations under the identical terms.

Sunday 21 September 2014

Sound Design Toolbox pt2 - XFade Container

Following on from the random container in part one, part two in this series is a different sample playback module. This is a player designed to easily create seamless looping sections with variable cross fade length. 

Part of my sound design process is creating long sections of sound which I record out of patches or programs as audio files. This is often from live manipulation of patches, controlled randomisation or other similar processes which produce interesting modulation or variation in sounds. I wanted a way to throw some of these sounds together quickly without having to worry about editing the files beforehand to make them work together. This container is designed with that in mind. Driven by a phasor~, it lets you choose a part of the file to play, adjust the pitch and length of the section being played back and seamlessly cross-fades back to the start position without any clicks. At its core is a slightly modified version of the wavefade example in the max examples (Extras (drop-down menu)>Examples overview >MSP >Sampling). 

The best way to get a feel for what it does is to try it out:

XFade Container 0.9

The is the most basic way to get it working is to load it into a bpatcher and check the box 'Embed patcher in parent' in the bpatcher inspector, this will then save the path of any files you load in.

Connect it up using a phasor~ like so:


The patch needs the frequency of the phasor~ as a float in its right inlet, so be sure to also connect that too.

Things get more interesting when you connect several up like so:


Try having several instances connected to the same phasor~, but with different settings for their individual rate multipliers. This creates interesting phase relationships between the sounds, so they connect up together like a series of tape loops. You can also use several instances with the same sound and adjust the pitch to create chords.

As with the previous device, this is a work in progress so is a bit untested. Please use it and report back any problems. 

This is part of a set of modules I'm intending to build, so when they are all at this stage I'll probably put some effort into making them look a little nicer! I'll also post some proper example patches.


Licensed under:


Attribution-NonCommercial-ShareAlike
CC BY-NC-SA 
 
This license lets others remix, tweak, and build upon your work non-commercially, as long as they credit you and license their new creations under the identical terms.


Thursday 28 August 2014

Sound Design Toolbox pt1 - Random Container


I've been inspired by this excellent article at Designing Sound to create a small range of modules designed to replicate the functionality of sample players used by game audio engines/middleware. The idea is to create a modular toolkit within Max aimed at opening up some non-linear sound design techniques.


This could be useful for:
  • Prototyping elements before they are implemented in-game
  • Using in any games created with max itself (I do hear of the odd one on the forums)
  • Designing sounds in a real-time live way, with plenty of options for control within Max (Quneo, Leap, Kinect etc)
  • General sample playback where looping and/or randomisation are needed
  • Potentially discovering components which max already has that may be useful for use in other environments
  • Experimenting using live models to design sounds for linear media

 
First up, I’ve created a random container for use in max:


The general idea is that you dump a folder full of samples in it, then a bang in the left inlet triggers a random sample. You can choose to have the last X samples not play, so to avoid people noticing any repetition. Then there's randomisable pitch amounts, global tuning, randomised reverse playback and variable polyphony. The second inlet will take an int to play a specified sample. 

As with Endjinn, this will remember file locations and re-load your sample as long as you embed the patcher so do this in the inspector every time you use one.

Some looping containers are coming next. I might also re-design the interface a bit for this one when they are all finished.

Here it is:

Random Container 0.9

Load it into a Bpatcher 


Licensed under:


Attribution-NonCommercial-ShareAlike
CC BY-NC-SA 
 
This license lets others remix, tweak, and build upon your work non-commercially, as long as they credit you and license their new creations under the identical terms.


Sunday 13 July 2014

Havoxicon

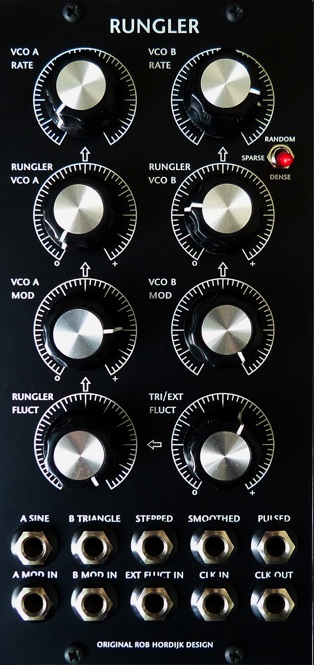
I want to not just talk about my own work here, but also highlight interesting tools by other Max users which might be of interest in a sound design context. Max user and composer jvkr, who is based in the Netherlands has released an interesting device called the Havoxicon. It is built around an unusual process derived from a hardware module called the Rungler, designed by Rob Hordijk:


The nice thing about this is the story behind the device from jvkr's blog, and that you can download the device for free (for Mac), contribute a few dollars if you find it useful, but then also poke around inside the Gen code which has been shared to the C74 forum. 

In use the Havoxicon is one of those devices which you learn through experimentation and feedback. Even though you may not understand how the process at the core works, you quickly get a sense of what the controls do, but it always has the capacity to surprise - I challenge you to download it and not spend at least an hour twiddling the knobs! In terms of output, the sound is very electronic, potentially useful for creating all sorts of GUI sounds or machine noises. Here is a composition from jvkr which should give you an idea of the sounds possible:


Thanks to jvkr for sharing this.

Tuesday 8 July 2014

Endjinn


Babbage Engine

Endjinn is a granular synthesis module designed to function with BEAP (Berklee Electro Acoustic Pedagogy) a modular synthesis environment built with Max.


I’ve just started tinkering with BEAP and am really excited by the possibilities. While Max is great for building things from the ground up or for creating complete devices, it’s not so conducive to making sounds quickly. BEAP adds a functional level of modularity to Max where you can sketch ideas down and make sounds fast. When you save a BEAP patch it also saves all your settings, so you can create useful patches to make specific sounds and then come back to them easily.


I’ve always thought that granular synthesis is especially useful for sound designers; as we tend to have extensive sound collections, we also have plenty of audio to use as source material for granulation. Building Endjinn was partly just a learning experience for me as I had used many granular synths before and had a  good grasp of how the process worked, but had never designed one from scratch. But I was also curious to try and create a device which differs from those already out there. Of great influence was the Monolake Granulator which I believe is one of the best sounding granulators around. I’ve also used the grainstretch~ external within Max quite a bit – it is also very flexible and also has some nice features. There are also a whole bunch of other synths, tutorials and other influences here (especially from the C74 forums – thanks to those who routinely share their knowledge there). 

Thinking of those two very different granulators, the Monolake Granulator is really a chromatic keyboard instrument; it is designed to be played, with other instruments, or at least other pitched sounds. Grainstretch~ is more a time stretching or pitch shifting tool. Both have their uses, and both use the same process at their core, but it’s how they are put together which makes them unique. With Endjinn I wanted to make a granulator that was somewhere in-between the two, where you could scan over a sound very precisely, but could also synchronise and control harmony and pitch closely. This was the result!:


Endjinn


Endjinn is a synchronous four oscillator granular synthesiser, each generating between 1-4 overlapping grain streams. CV (control voltage) from any of the BEAP devices can be used to scan grain playback over a sound file in any pattern or direction. CV can also control grain rate and a pitch multiplier for all oscillators. The usual granular parameters are present – random pitch, position and volume per grain. Unusually for a granulator, grain rate can also be very slow – down to 0.1hz and through to 100hz, so you can effectively create slowly cross-faded soundscapes. Phase distortion can be applied to the playback of individual grains, with user-defined shapes. Similarly, the grain envelope can be designed within the synth or loaded in as a separate sound file. Pitch and rate parameters can be ganged together for fast tweaking and setting at precision increments.

An overview of the controls:

Global Controls 

  • Position - Starting position of grain playback
  • Scan Range - Defines the range over which signal from the CV input affects the start position of each grain
  • Pitch - Adjusts the pitch of all oscillators (via playback rate, so -12 will play back all grains at half speed)


Randomisation

  • Panning – ­Panning randomisation for each grain, for stereo sources this effectively mixes the left and right channels together, 50% allows a maximum of a 50/50 mix of both channels on either side, 100% allows for a full swap of the left and right channels, with every possible value in between.
  •  Volume – Volume randomisation per grain, 0% means that all grains will play at 100% volume, 100% means that each grain will play somewhere between 0-100% volume, 50% and grains will play between 50-100% volume.
  • Pitch – Randomisation of pitch per grain, either up or down up to one octave.
  • Position Variation – Adds a random value to the start position of each grain, set in milliseconds. 


Oscillator Controls

  • Frequency - Frequency of grain generation, between 0.1hz – 100hz.
  • Pitch by Grain Rate - Pitch control by varying grain playback rate, this does not affect the grain length. A value of 0.5 will play the grain back at half speed (ie half the pitch, or one octave down). A value of 2 will play the grain back at twice the base rate, or an octave up.
  • Pitch by Grain Length - Pitch control by varying length of the sample taken by each grain. A value of 0.5 will decrease the length of sound sampled by 50% for each grain, effectively reducing the pitch by half. A value of 2 will increase the length of sound sampled by 100%, effectively doubling the pitch.
  • Offset – Adds a +/- offset to the grain start position, allowing the oscillators to play from different points of the sample.
  • Grain Streams – Defines the number of grain streams used by each oscillator. These overlap as shown in the diagram below, Visual feedback of this process is displayed on the grain position bar.


  •  Parameter Link - This feature allows control of all oscillator values as a ‘cascade’ across the oscillators from Osc1 – Osc4. When the link is active, values will either add or multiply down through the oscillators dependent on the ratio. This was implemented for easy harmonisation and control of all oscillator values. So if the ratio is set to 1, the control for Osc1 will set the same parameter value for all oscillators. If the ratio is set to 1.5 and the multiplier set o ‘add’ the 0.5 will be added down through the oscillators eg 1,1.5,2,2.5 but if the multiplier is set to ‘multiply’ then each value will be multiplied by 1.5 down the oscillators eg 1,1.5,2.25,3.375
  • Waveform Display - The waveform display shows left and right channels of the loaded sound file. The red indicator displays the scan start position, blue shows the end position and green the current position. The file name is displayed in the lower right-hand corner.
  • Grain Position Display - Displays the playback position of each grain. The display will adjust to the amount of streams in use for each oscillator.
  • CV Modulation - Inputs 2-4 provide CV control (-5v through till +5v) over multipliers affecting grain rate, pitch by grain playback rate and pitch by length of sound sampled per grain. For example, if you connect a 1hz triangle LFO to inlet 3 and change the CV multiplier to min:0.5 max:1.0, then the pitch will fluctuate between 50% - 100% and back again, as the LFO moves through its cycle.
  • Grain Phase Distortion - It is possible to distort the linear ramp that controls grain playback, affecting the pitch and harmonics present in each grain. There are a selection of presets which show some basic behaviour here; preset one is set to linear playback forwards, two for backwards playback, three is a decelerating ramp, four a rough triangle, five and six are more complex shapes. Custom shapes can be defined using the breakpoint generator (Shift-click removes points, alt-click-drag adjusts curves in curve mode) or through loading a sound file to be used as a transfer function.
  • Grain Envelope - Defines the shape of envelope applied to each grain. The default shape is half a cycles of a sine wave that should provide smooth playback. As with the phase distortion, user specified shapes can be used or sound files can be loaded and used as grain envelopes.
  • Output Stage - Each oscillator has two outputs at the bottom of the device, one left and one right.   

So hopefully you are now desperately eager to try the device out?! Well first you should install BEAP from here:

https://github.com/stretta/BEAP

Endjinn will actually run without all the BEAP stuff, but it is designed to function with the BEAP system, so if you install BEAP first you can then expand on Endjinn with all the cool BEAP modules.

Here are the patches:

Endjinn 1.1

One is just the patch itself, this is called Enjinn 1.1.maxpat, the other is Endjinn with a BEAP output and some LFO modules - you should start there. 

I'm might do a video tutorial for this later if people are interested, as there are some odd functions of this synth that might need explanation. A few quick tips though:

- Enjinn does smooth granular textures well, try four streams per oscillator and grain rates of 4-8hz, then add some random panning and a bit of position variation. This works well on pitched sounds (eg bells)
- Unusual 'scan' effects can be acheived by using an LFO to scan the waveform with harmonically pitched oscillators.
- Glitchy sounds can be achieved with custom envelopes and user defined phase distortion shapes.

And finally here is a quick composition of my own created with Endjinn and some sounds made by Resonate:


After posting my email on the page for Resonate I had a few people get in touch with their thoughts and feedback. It's actually really nice to hear that these things are useful, so please get in touch:

<pre><code>
----------begin_max5_patcher----------
242.3ocUPFrZCCCDD8rBj+AgN6ZraCtI8T62QoTVqnlnDKIy50ASC8euRqrM
sWzvN6SrCy8saDp1vjYPIeQ9tTHtGcDrWxQrXHTNXR2ACLnRGbNimTEyKIyD
wKb.ds73HdFbuhA8UC4.aWYjeksGH8Yq+zmnQS4y97gxpBYcy9jrq9PVJqje
r7ouvSsI1p3pYK+ny56LDmn5UvfmFreaRlO8e5vHsfW8WbO3Xb0anE5Vyo8H
aFZu7viJ16msaRZTxASA882L3fM34xhqpXEbIfo4lh7r0mmyYTgla1kuLi.X
rQnXcLh4jL0rKcR9fwmeAvp6gsO
-----------end_max5_patcher-----------
</code></pre>


Enjoy!

Sunday 2 February 2014

Resonate - Windows Standalone

As promised, here is a standalone Windows version of the program, get it here:

Resonate 1.0 Win

A bit untested, but seems to work fine. The only strange behavior is that (on my machine, at least) you need to close the program form the task manager. Not sure why this is at the moment, but will update this post if I solve it.

Wednesday 22 January 2014

Creative Convolution Part 1 - Resonate


Convolution reverb is a great thing. Its usual use - being able to capture and re-create spatial acoustics, is useful for a range of tasks such as fitting dialogue in a scene, or just creating a sense of space. But it's worth taking a moment to think about what is happening during this process. One sound file is effectively being filtered through another, with the convolution reverb filtering the frequency content of each sample through all the samples present in the IR (a simple explanation, but adequate here). The impulse response files themselves effectively hold a snapshot of the acoustic data of a space, or at least from a point in the space. This data describes how the room responds acoustically to an impulse or short burst of broadband noise. So essentially, you could think of this in a different way, about sound files as containers of information - acoustic information. But this data is made up (like any sound file) of frequency content over time, so the convolution reverb process is potentially useful for much more than just recreating the acoustic space of a room; it is effectively a kind of filter, and that is the main subject here - an exploration of that idea. 

I once heard a really useful definition of timbre: “spectral footprint over time”.
From a sound design perspective getting the correct timbre for a sound is important as it connects the sound to its source. Interestingly, we naturally identify sounds back to their source (or object which created the sound) rather than by their acoustic properties. This explains why timbre is so important - it immediately describes the source, ie hollow or metallic, and gives the listener an impression of what created the sound.
 

If you found your way here, I expect you might be familiar with this SoundWorks video for the making of Inception. I really love the bit at 3:20 where Richard King is describing the subwoofer recordings they made in the warehouse; there is something fascinating about how powerful and complex the natural resonances of the space are.  


I've long had an interest in physical modelling as a technique for designing sounds, so when I saw that video I started wondering what it would take to achieve the same results artificially. Would it be possible to model the space and materials of a location like that and produce some useful sounds? 

I think that understanding some of the principles of physical modelling are useful not just for creating sounds to use, but also to help explain how and why sound works in the way it does. I've done a few experiments in Max using filterbanks and basic waveguides to try and simulate real-world physical resonances with varying degrees of success, but experimenting with convolution about a year ago, I discovered some interesting techniques which are related…it started with a set of recordings like these:


These are impacts on various metal objects recorded with a contact transducer. If you’ve ever used one of these, you will know that one of the great things about recordings made in this way, is that they are completely dry, this is because the transducer only picks up the vibrations traveling through the object itself. It means that you can go anywhere to record these sounds, even next to busy roads where a conventional microphone recording would be useless because of noise from the road. So I recorded a whole library of these, experimenting with different objects and different methods of striking them.

It was while doing this that I had the realisation – this process is exactly the same as taking impulse responses of rooms, I was just collecting acoustic data. But when taking an IR of a room, you are collecting data about how the room behaves acoustically, and these recordings contain data about the resonance properties of the material. The broadband noise used in recording an IR in a room, such as a balloon burst, is comparable to the impulse created when striking an object. They are both a burst of broadband noise followed by their effect on something – in the case of the room it is the reverberant characteristics, with a material it is the resonant properties.

Here’s an example of these sort of sounds used as IRs in a convolution reverb, you will hear a dry vocal sample, then the sound of the impact recorded with the contact transducer, then the vocal sample through the convolution reverb with the impact loaded as an IR. You can hear how the original sound is filtered through the resonance properties of the material:


It’s interesting to note how sounds with a long decay still create a sound with a reverb-like quality to it, but sounds with less decay create more of a filtering effect. 

Around this time two other things caught my attention. Firstly, Alex Harker and Pierre Alexandre Tremblay, both from Huddersfield University, released the HISS Tools - a collection of Max objects designed for pretty much any convolution operation you can think of (and a few more besides!). If you’ve used the Max for Live convolution reverb before, they are at the heart of it. For sound designers these are an amazing addition to Max, as they allow anyone to integrate convolution reverb into any patch quickly and easily. Huge thanks to them for making these objects publicly available.

With this in mind I started sketching down some ideas for a Max patch that would take advantage of these. It began as a kind of configurable resonant space, partly inspired by techniques used for mixing sounds together in game audio, and partly from the experiments I’ve been describing. 

The second thing that caught my attention at that time, was this post at Designing Sound by Douglas Murray, focusing on his use of convolution reverb  to create infinite airfill using white noise as a sound source. Up until this time I had been using a range of sounds to ‘excite’ the IRs, but this was another direction, and really made so much sense for creating ambient, atmospheric sounds. It’s a great technique, and as an extension you can increase the resonance by stacking up multiple instances of convolution reverb loaded with the same sound as an IR. Here’s an example similar to before but with one, two, three and four instances of the same reverb running in series.

 
When using white noise as a source, with one instance of reverb you will always hear the noise coming through to some degree, but with two or more instances the sound becomes progressively more filtered and the dominant harmonics of the IR become accentuated.

Be careful if you want to try this inside a regular DAW – there will need to be some heavy gain reduction somewhere in your signal chain, otherwise extreme clipping will result!

Sounds of this kind are really useful for creating evocative ambiances or adding some extra resonance to metal hits and scrapes. I like the idea of having a palette of sounds like these, based just on texture, using these in layers the same way a painter would with oils on a canvas.

So how about expanding this idea? There is certainly scope with this. I spent a bit of time designing sounds for this purpose, and that is definitely worth pursuing, but I’m not going to go too far into them here. Instead, I want to talk about another technique for generating interesting sounds for use as IR’s. Whilst designing specific sounds, I started experimenting with using music tracks as a source for IR's. I’d snip out small sections of music with interesting harmonics then load them as IR's into multiple reverbs and play noise or filtered noise through them. The resulting sound is like a constant smear of all the frequencies present in the music, sounding similar to the results you can achieve with granular synthesis but with a richer sound. Bored of slicing music up manually I made a small utility patch to automate the process. It takes a sound file and chops it into smaller slices. The patch is fairly crude, but it works fine for the purposes of this article. To work flawlessly it really needs to be a phasor-synchronised system, (feel free to improve it if you like, but send me a better version if you do!). It’s reasonably straightforward to use, just follow the instructions.


Here is a link to the patch:

Chopper


So that's a bit about the history of where the idea for this device originated. It actually references a whole bunch of work shared by other people, and tries to bring those ideas together and create something new. For me, this is all about tool building. Taking a process and re-thinking how it could work, combining existing technology in new ways to create new possibilities. It takes this process which in a DAW is very clunky and frustrating and reimagines the process. Everything here would be achievable with separate effects within a DAW, but in reality what you can achieve here in minutes would take hours of setting up and tweaking. 

Here is the result, it is a device which explores resonance, filtering and spatial positioning.


There are three sections to the patch, The sound source, the nodefield and the effects section. The sound source creates the sound used to feed the IR section of the patch. There are currently three options here:
  • Noise Gen - A simple noise generator with amplitude envelope and sweepable filter.
  • Grain Player - A basic granular file player, built around Timo Rosendal’s Grainstretch~ external.
  • Loop Player - A vari-speed looping sound player with pitch and amplitude envelope capabilities.

The middle section or what I've called the node field is the unique part of the device. Here, there are eight FX lanes, each contains 2 IR reverb objects in series. This is the signal flow inside each:


The output volume for each effects lane, or node, can be linked to the node weighting (ie, how far into the node area the crosshairs are). This is a linear value form 0-100% volume. Panning can be linked to the position of each node across the X axis of the node field. If this is turned off, the user can adjust the input volume of each by using the multislider at the top of each fx chain. Pan position can also be linked to the position of each node across the X axis of the nodefield. This generates a stereo field across the X axis of the node field, so sounds can swept across the resonators. There is a central system which distributes audio files to the convolution reverb objects; this allows you to put all the sound files you want to use as IR’s in a folder, point the patch to that folder and then quickly choose between them from a menu system. A pair of LFO's are linked to the position of the cross hairs in the node field, these can be used to sweep across the nodefield, providing a spatial approach to mixing. There is also an envelope control labelled 'input gain scaling' which defines the shape of the gain slope, so you can have linear, exponential or any other gain curve, or even more complex, experimental patterns.

The effects section below comprises of the following:
  • Harmoniser - Splits the audio stream into six, providing pitch shifting, delay and pan on each channel.
  • Filter - A basic multi-mode filter
  • Comb Filter - Sweepable comb filter
  • Distortion - A combined bit crusher and overdrive distortion box. Signal path is crush>drive.
  • 2x VST/AU effects - Load in whatever you like here.
  • IR Reverb - Very basic convolution reverb. Comes pre-loaded with some IR's from the OpenAIR library 
All the effects are combined using a matrix, so you can route audio through them in any combination, in parallel or in series. There is no feedback protection, so be careful there.

I expect you're asking what does it sound like?

Well I've been using it in a particular way, and have had that in mind through the development phase. But really it is just a combination of playback devices and effects, so use it however you see fit. Having said that, here are some examples, these are straight out of the app using the built in effects - no fancy external plugins.

First up, a selection of static drones created with the white noise source. Note how the frequency fluctuations of the white noise add subtle but continuous variation to the drones:


These are some metallic resonances created by using the contact mic recordings above as IR's


Here is an evolving drone which also uses white noise as a source but sweeps over the IR's using the LFO:


This is a granular example. It takes a recording of a music box and plays it backwards with some position variation, it then filters this through some snippets of a female choir used as IR's


Here is some more radical granulation - frozen grain sweeps with some extra harmonic richness from the IR section.


These sequences use white noise as a sound source. The noise has a rhythmic amplitude envelope and filter sweep applied to create an almost steam-like mechanical sound.